
 Portal
Top posting users this month
| No user |
Most active topic starters
| Backlash | ||||
| Deepblu505 | ||||
| al k | ||||
| 07_hemi_thunderroad | ||||
| Coach | ||||
| Snagged | ||||
| fishgent | ||||
| BenB | ||||
| joe.plotino | ||||
| crappieassassin |
Painting some baits for practice
4 posters
Page 1 of 1
![]()
 Painting some baits for practice
![]() Backlash Sun Aug 12, 2012 6:53 pm
Backlash Sun Aug 12, 2012 6:53 pm
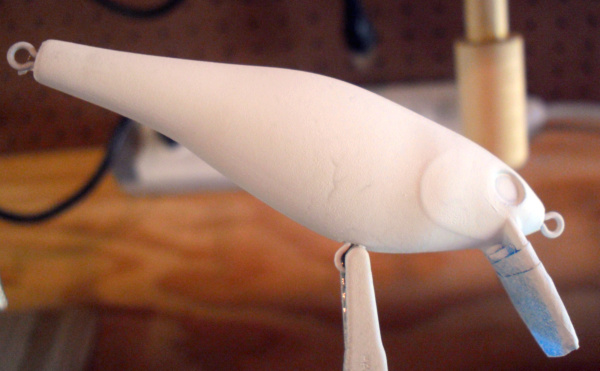
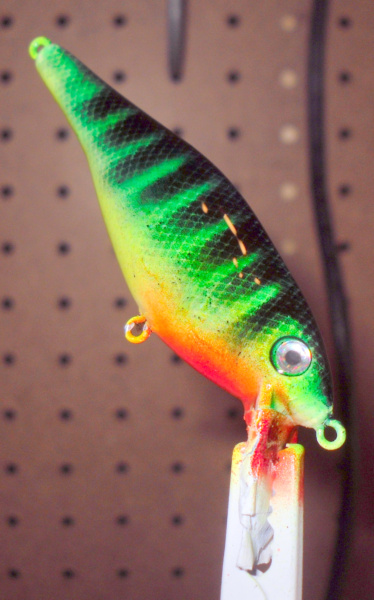
I received some unpainted crankbait bodies a couple of weeks ago and we have been in the process of building lure dryers and preparing everything to get ready to paint. So, with a few hours of cool tempetures in the mornings, I decided to pratice on a few lures.
The lures came from Jann's Netcraft and the first step is to remove the sharp edges of the joints with some fine sandpaper. My airbrush for this project is a Copic Marker set. Normally, I would use a double action brush and Createx paints for lures, however we are planning for an airbrushing class, so I wanted to practice with it a bit. The benefit of the Copic system is that you can change colors quickly by simply removing one marker from the trigger system and replacing it with another. This eliminates alot of mess that comes with paint mixing and clean-up. However, you can have a hefty investment in order to have a broad color palette.
First step is to paint the lure body with a base coat of white. a heat gun or hair dryer can be used between coats to set the paint allowing you to quickly go to the next color.
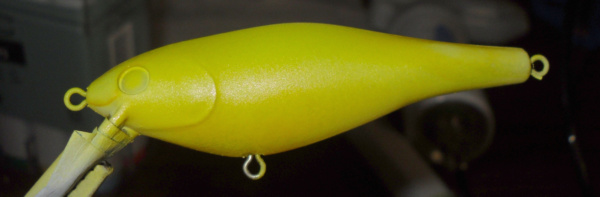
Next paint the entire lure lure with a coat of yellow.
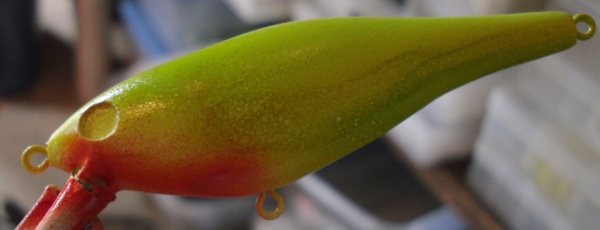
Now, the breat area is painted with a small amount of orange.

Then, add a coat of light green to the back and sides of the lure. One thing to note is that Copic brusg sprays at an upward angler unlike the standard airbrush which spray a cone directly forward of the nozzle. I recommend that you practice on a piece of paper before painting your lures.
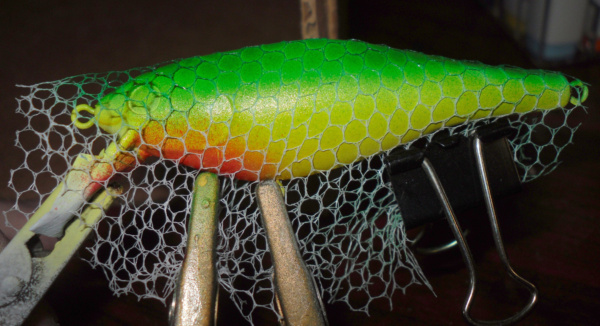
Next, place scale netting over the lure and secure it in place with gator clips. a good source for this material is bridal veil material from a local craft store.. Then spray the back and sides with a dark green.
In the final step, you can use a comb as a stencil to obtain the vertical bar pattern that is painted with black.

The last thing is to apply a two part epoxy as a top coat and place on the lure dryer, overnight.
The lures came from Jann's Netcraft and the first step is to remove the sharp edges of the joints with some fine sandpaper. My airbrush for this project is a Copic Marker set. Normally, I would use a double action brush and Createx paints for lures, however we are planning for an airbrushing class, so I wanted to practice with it a bit. The benefit of the Copic system is that you can change colors quickly by simply removing one marker from the trigger system and replacing it with another. This eliminates alot of mess that comes with paint mixing and clean-up. However, you can have a hefty investment in order to have a broad color palette.
First step is to paint the lure body with a base coat of white. a heat gun or hair dryer can be used between coats to set the paint allowing you to quickly go to the next color.
Next paint the entire lure lure with a coat of yellow.
Now, the breat area is painted with a small amount of orange.
Then, add a coat of light green to the back and sides of the lure. One thing to note is that Copic brusg sprays at an upward angler unlike the standard airbrush which spray a cone directly forward of the nozzle. I recommend that you practice on a piece of paper before painting your lures.
Next, place scale netting over the lure and secure it in place with gator clips. a good source for this material is bridal veil material from a local craft store.. Then spray the back and sides with a dark green.
In the final step, you can use a comb as a stencil to obtain the vertical bar pattern that is painted with black.
The last thing is to apply a two part epoxy as a top coat and place on the lure dryer, overnight.

Backlash- Admin
- Join date : 2010-08-23
Location : Fayetteville, NC -

![]()
![]()
Refurbishing Old Lures
![]() Backlash Tue Aug 21, 2012 8:16 am
Backlash Tue Aug 21, 2012 8:16 am
I have been messing around with a few old lures that I have pulled from lakes or ponds over the years and trying to bring new life to them. Below are a couple of projects that I have started. One before and after that still needs a kill dot painted in place, but for the most part are finished.
Before
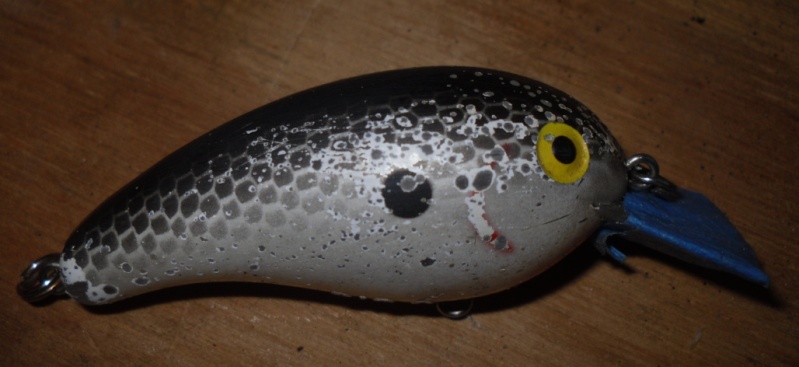
After
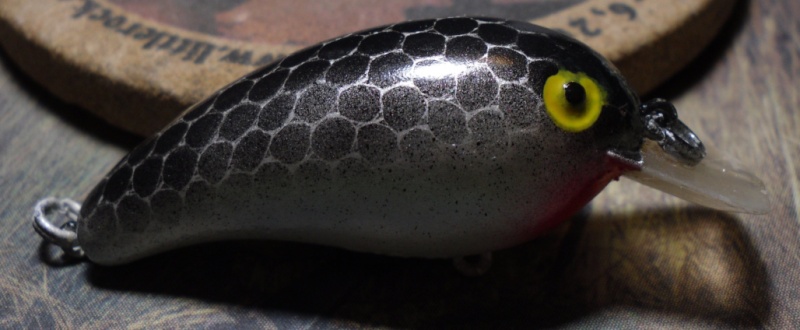
And another reclaimed bait.

Before
After
And another reclaimed bait.
Backlash- Admin
- Join date : 2010-08-23
Location : Fayetteville, NC -
![]()
![]()
Re: Painting some baits for practice
![]() BenB Wed May 29, 2013 5:03 pm
BenB Wed May 29, 2013 5:03 pm
Hey Tom,
I like what you did with these crankbaits. I saw your flies and the paintjob looks great! I have a couple of crankbaits that could use a good paintjob. Would you be interested in doing them, for compensation of course? There's one that needs a complete paintjob and one that good use freshening up, if possible. Both of them need new stick-on eyes. I know custom paintjobs are a bit pricey and I'm prepared for that. The best part about it all is, I'm not in a hurry what-so-ever to get them done so there's no rush. I don't know what your current projects consist of. I'll understand if you don't have the time. Let me know.
Ben
BenB- Deckhand
- Join date : 2012-02-11
Age : 50
Location : Fayetteville, NC Waldo's Beach -
![]()
![]()
Re: Painting some baits for practice
![]() 07_hemi_thunderroad Wed May 29, 2013 9:47 pm
07_hemi_thunderroad Wed May 29, 2013 9:47 pm

07_hemi_thunderroad- Guide
- Join date : 2010-08-28
Age : 42
Location : Parkton, NC -
![]()
![]()
Re: Painting some baits for practice
![]() Coach Thu May 30, 2013 7:52 pm
Coach Thu May 30, 2013 7:52 pm
How did you get the effects? I seem to remember someone saying use a mesh produce bag.

Coach- Guide
- Join date : 2010-10-18
Age : 48
Location : Fayetteville
![]()
![]()
Re: Painting some baits for practice
![]() Coach Thu May 30, 2013 8:06 pm
Coach Thu May 30, 2013 8:06 pm
Never mind. I missed the pic telling what to use the first time.
Coach- Guide
- Join date : 2010-10-18
Age : 48
Location : Fayetteville
![]()
![]()
Re: Painting some baits for practice
![]() Backlash Tue Jun 11, 2013 11:10 am
Backlash Tue Jun 11, 2013 11:10 am
Hey Ben,
If you want to get those baits over to me I'll see what I can do with them. I have some time to tinker here and there.
If you want to get those baits over to me I'll see what I can do with them. I have some time to tinker here and there.
Backlash- Admin
- Join date : 2010-08-23
Location : Fayetteville, NC -
![]()
![]()
![]()

 Similar topics
» Who's Making their own baits?
» Psycho Baits
» Soft Plastic Baits to be Banned
» Strike King Introduces Slab Hammer Crappie Baits
» Psycho Baits
» Soft Plastic Baits to be Banned
» Strike King Introduces Slab Hammer Crappie Baits
Page 1 of 1
Permissions in this forum:
You cannot reply to topics in this forum